More Windows Installer articles
Abstract: With Windows Installer's user interface tables you cannot create listboxes that allow selection of multiple entries. This article explains an alternative solution that uses two list boxes side by side, one for "available" items and one for "selected" items, with Add and Remove button to move entries from one list to the other. It also shows how to dynamically populate MSI tables using VBScript custom actions (to add rows to the ListBox table or to remove them), and how to refresh a dialog using the "twin dialog" trick (which is required to refresh the listboxes on screen after adding or removing items).
GERMAN: Deutsche Version dieses Artikels
Download for this article:
![]() MultiListBox.zip
MultiListBox.zip
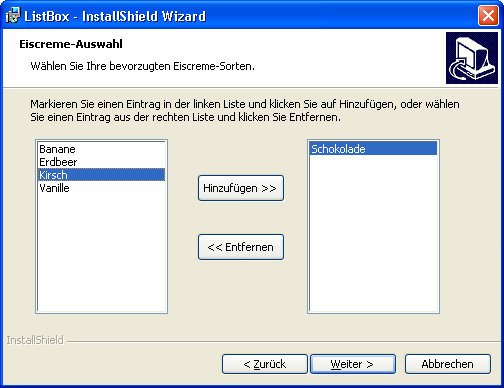
This is how the dialog will look like when you run the sample msi file that is included in the ZIP file for this article:

The sample was created with a German user interface but it should be self explanatory even if you don't understand the languge. You have two lists of items (icecreme flavors in this sample). Klicking the >> button will move the selected entry from the left list to the right list, and the << button will move an entry from the right list to the left list. Note that a button is only enabled if an entry is sected in the respective list.
In the MSI file there's a dialog called IceCremeA. This is the dialog with the two listboxes. And there's a similar dialog IceCremeB. They look identical. Clicking the Add and Remove buttons to move entries from one list to the other will also flip between dialog A and B. This is required to refresh the list boxes. This "twin dialog" trickis the only way to force Windows Installer to re-read the content of the ListBox table.
In the MSI file there's also custom table called IceCremeList. It uses the same schema as the ListBox table and holds the available entries for the list boxes, which are empty in the MSI file. This table will be used to populate the ListBox table at runtime. This is required because you cannot reliably modify table rows that are stored in the MSI file. So I didn't put these values in the ListBox table but used a custom table instead.
There are three custom actions (VBScript stored in the Binary table, source included in the ZIP file):
Note that the Property column of the ListBox table decides in which of the listboxes an entry is displayed.
Remember that this is sample code. You may want to add some error checking and test thoroughly. In general, a DLL would be preferred over VBScript for custom actions, so you may want to convert the code to C for production use. In any case: use on your own risk.
Stefan Krueger is working as freelance setup consultant and is running the InstallSite.org web site, a place where setup developers share resources and information among peers. Stefan has been recognized by Microsoft as an MVP (Most Valuable Professional) for Windows Installer.
More Windows Installer articles
|
|
News | Discussions | Windows Installer | Related Tools | More Help | InstallScript | About InstallSite | Shop | Site Search |
|
|
Neuigkeiten | Diskussionsgruppen | Windows Installer | MSI FAQ | Artikel | Shop | Suche |
Copyright © by InstallSite Stefan
Krueger. All rights reserved. Legal
information.
Impressum/Imprint
Datenschutzerklärung/Privacy Policy
By using this site you agree to the license
agreement. Webmaster contact